
By Alyssa Parten |
Core stability is characterized by the ability to retain or reclaim control of the trunk (osteoarticular and muscular structures), when disturbed by internal and external forces. Without the supportive muscles of the trunk, it is estimated that it would take approximately 9kg/(20lbs) of external load for internal structures of the human body to buckle. This fact alone illustrates how important it is to achieve and maintain strength and stability of what links the upper and lower extremities together. In athletics, stability of the core promotes better bracing to protect the spine under heavy loads, and guarding internal structures and vital organs in contact sports. Additionally, core stability and stiffness is crucial in force transfer from the lower body (hips) through to the upper body (shoulders), especially in sports involving throwing, striking, kicking, pushing, pulling, swinging, and/or running. From an injury prevention perspective, development of the core enhances stability of the spine and pelvic region, which may contribute in lowering the risk of lumbar and lower extremity pain and injury.
There are many exercises that can increase core stability, such as planks, bird dogs, dead bug variations, etc. To get the most out of them, proper technique must be maintained throughout the duration of the exercise. This includes correct positioning from head to toe and moving or holding a position in a controlled manner. Rushing through a core stability exercise may drastically decrease the potential effectiveness. When performed correctly, core stability exercises improve coactivation patters of muscles that enhance the stability of spinal structures. Among my favorite exercises for core stability are the traditional dead bug and the dead bug with overhead letdown.
The dead bug is an isometric anterior core exercise that targets primarily the rectus abdominus and external obliques. To perform the dead bug, begin by lying in a supine (chest up) position with arms up and directly over the shoulders, elbows fully extended, knees and hips flexed at a 90-degree angle, and ankles in dorsiflexion. In an alternating fashion, lower one heel to the ground (maintaining 90 degrees of flexion at the knee). After touching the heel to the floor, return to starting position and repeat on the opposite leg. A common reflex is as one leg lowers to the ground; the opposite knee moves upward. Instead, be sure the knees are stacked over the hips, and at no point during the exercise pass the hips toward the naval. Additionally, maintain a neutral lumbopelvic position by pressing the ribs into the floor, preventing extension of the lumbar spine. The dead bug overhead letdown implements the starting position of a traditional dead bug, as well. The difference is, instead of movement of the lower extremities, the arms slowly lower to the floor with a light kettlebell in hand, resisting flaring of the ribs to prevent extension of the low back. It is ok for the elbows to be slightly bent as the arms move over head. Below are photo demonstrations for each.
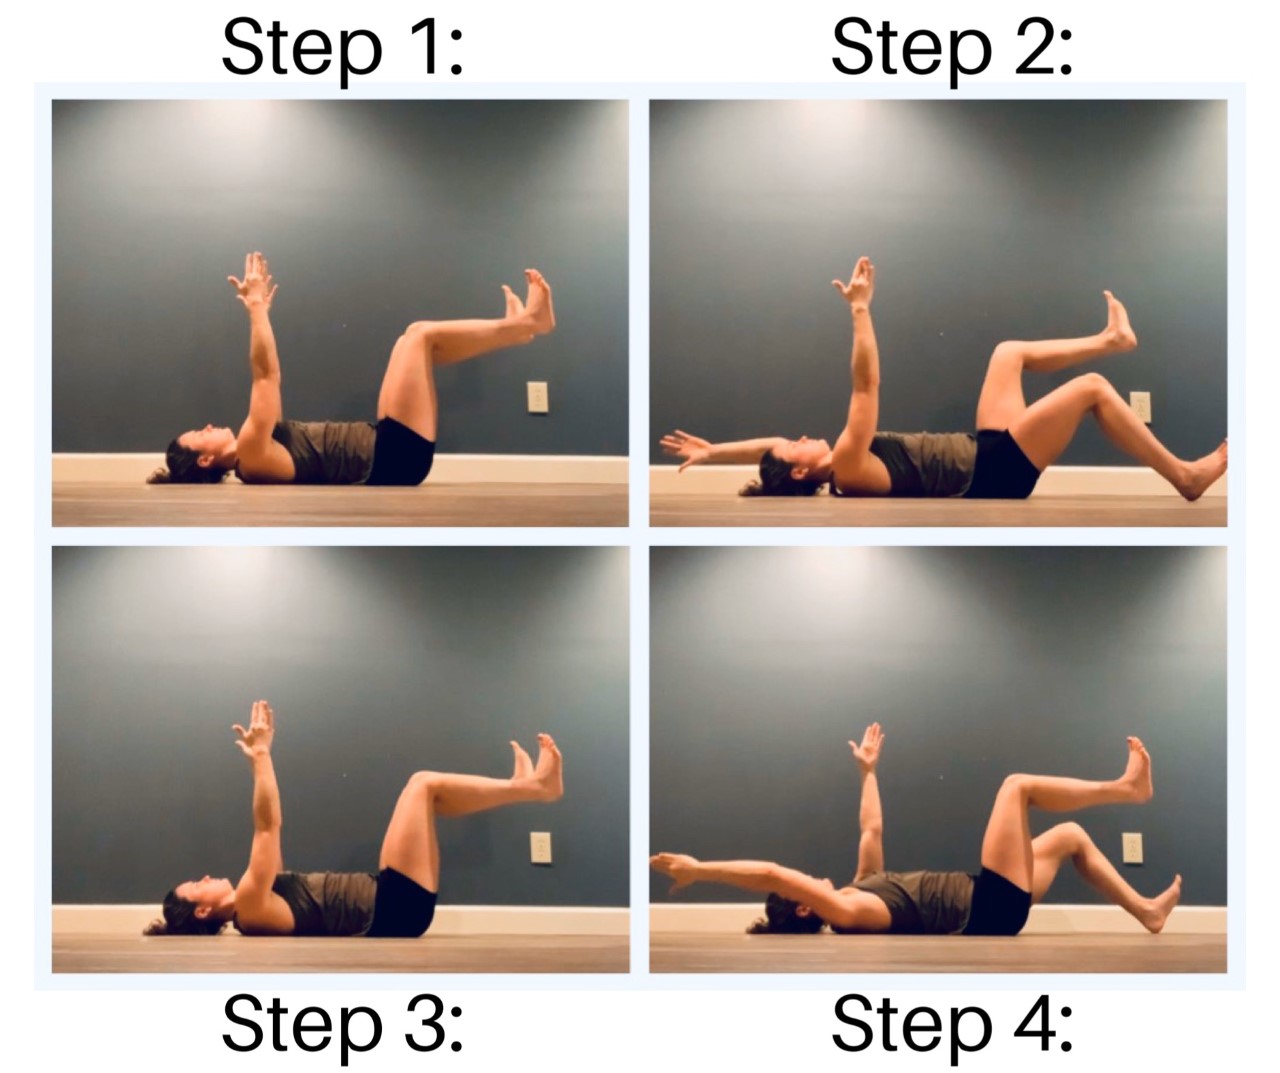
Dead Bug
- Begin with hips and knees flexed at 90 degrees, ankles in dorsiflexion, and elbows fully extended over chest. Make sure knees and ankles are about hip width apart, and arms about shoulder width apart.
- Press the ribs into the floor to prevent until he low back from extending. This should be focused on throughout the exercise.
- Slowly and controlled, lower one arm overhead together with the opposite leg until the heel grazes the floor.
- Return those limbs to starting position and repeat on other side. Continue alternating sides for desired reps or until form begins to break down.
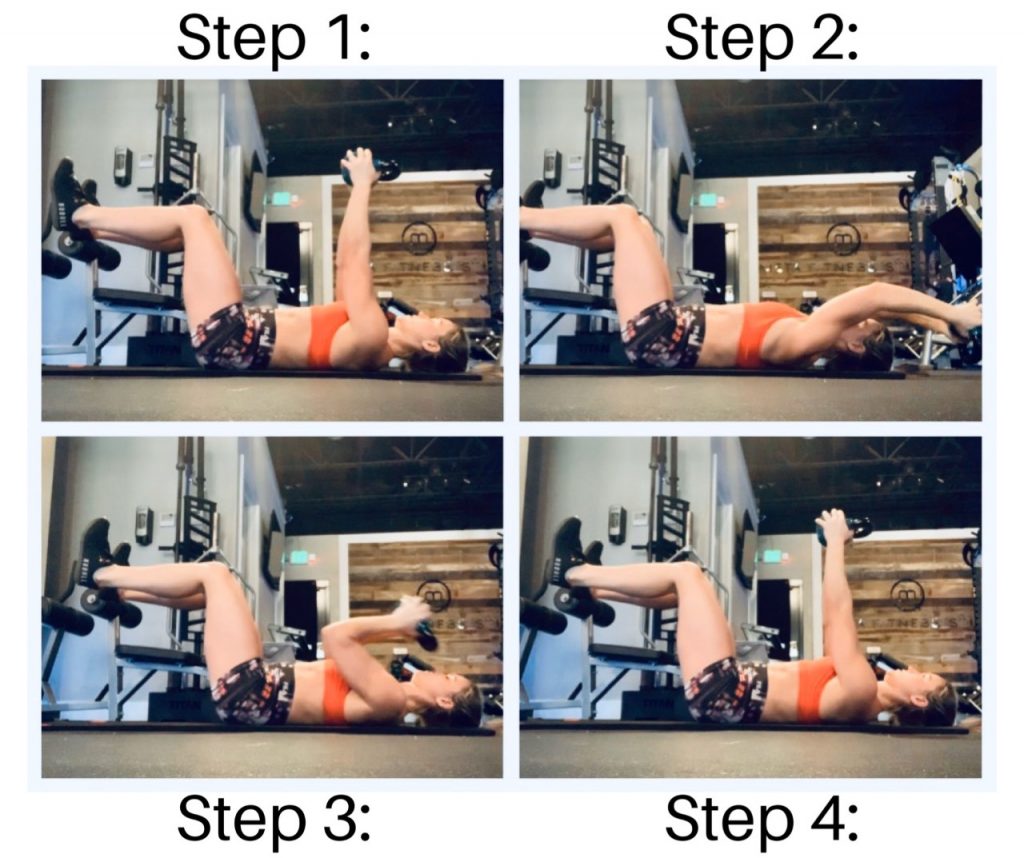
Dead Bug with Overhead Letdown
- Begin with hips and knees flexed at 90 degrees, ankles in dorsiflexion, and elbows fully extended over chest, holding a light kettlebell. Make sure knees and ankles are about hip width apart/not touching.
- Press the ribs into the floor to prevent the low back from extending, as the kettlebell is slowly lowered overhead. It is ok for the elbows to be slightly bent during this phase.
- Once the handle of the kettlebell does or comes close to grazing the floor, in one swift swoop, bring it right in front of the chest and back to the starting position.
- Repeat for desired reps or until form begins to break down
Alyssa Parten is a NSCA-CSCS and USAPL certified personal trainer and powerlifting coach from Birmingham, Alabama. She received her Bachelors in Exercise and Sport Science from The University of Alabama and is currently pursuing a double Masters at the University of Concordia Chicago in Human Movement Science and Strength & Conditioning. Currently, she works in a studio personal training gym as a personal trainer and strength coach and owns an online powerlifting coaching business, Ladybeef Inc. Additional certifications include: Precision Nutrition Level 1, TPI Level 1, and Human Movement Specialist.
Website: www.ladybeef.com
Instagram: @alyssaparten
Email: alyssa@ladybeef.com